Setting up your email program to use our mail system.
The purpose of this tutorial is to show you how to configure your email client ot use our mail server for POP3 email collection and
SMTP. This particular tute will be based on Micro$oft Outlook Express, but an Outlook 2000 tutorial will soon follow.
(Note: we personally suggest you do not use Outlook or Outlook Express as both have a very long history of security flaws and virus
issues. (in some circles these programs, together with IIS (Micro$oft web server) and Internet Explorer are called
"The Micro$oft virus transmission system"). Our personal suggestion for an email client is the free Mozilla Thunderbird application.
Thunderbird has an inbuilt learning spam engine, meaning it can learn what messages are spam and act accordlingly. It also has many
features that make it much more secure then Micro$ofts email applications traditionally are.)
Anyway, enough sermonizing.. onto the instructions. :-)
First things first, before you follow this tutorial, you should complete the little tute here
first or you will get SSL certificate errors each time you check your email.
Pop3 with Outlook Express
Step 1.
Open Outlook Express by using the start/programs menu. (or alternatively go to "Start->run" and type: "C:\Program Files\Outlook Express\msimn.exe"
into the box provided and click OK.)
Windows XP users can click on the start button and choose "Email".

Step 2.
Click on the tools menu up the top of the Outlook Express window, and from there select the "Accounts" menu entry.

Step 3.
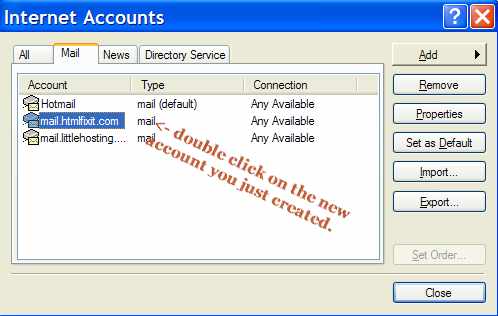
Step 2 will bring up the "Internet Accounts" box, from there click on the "Mail" tab, then click on the ""Add" button on the right hand side, and select "Mail"

Step 4.
This step is pretty clear, simply enter the name you want to appear in your emails with your email address, and click "Next".

Step 5.
Likewise easy, you enter your email address and again click next.

Step 6.
Make sure POP3 is selected in the drop down box, and enter: mail.htmlfixit.com in the "Incomming mail box" and
enter your ISP's mail server in the SMTP box.
(note, if you have arranged to use our SMTP service, put mail.htmlfixit.com
into the SMTP box as well.)
Then click Next to proceed to the next step.

Step 7.
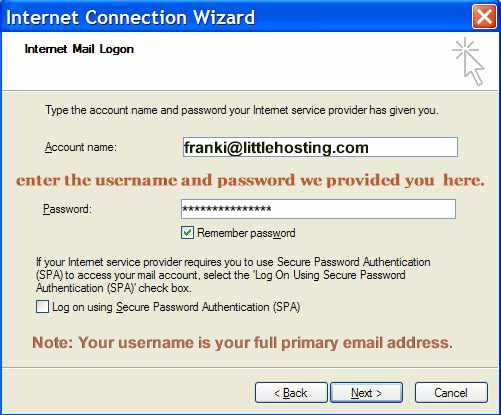
If you have arranged POP3 with us, this is the screen where you would enter the username and password we provided you with.
Do NOT check the "SPA" checkbox, it will not work if you do.
Click Next, and a congratulations screen will appear with a "finish" button, click that and you'll go back to the mail accounts summary screen.

Step 8.
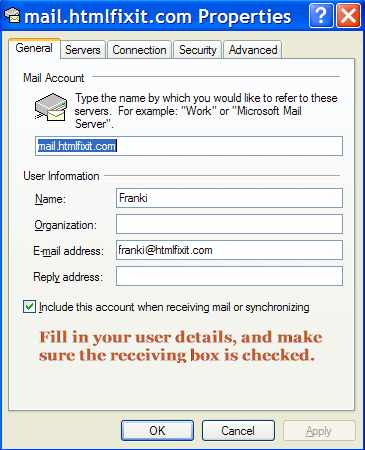
Double click on the new mail account you just created. this will bring up the details section of the new account settings.

Step 9.
Fill in the user settings to whatever you deem appropraite.
(Note: unless you are using the account to send mail to mailing lists, you should put your email address into the
"reply address" box. If you use the account for mailing lists, leave the box empty.)
After you've completed that, click on the advanced tab up the top and proceed to step 10.

Step 10.
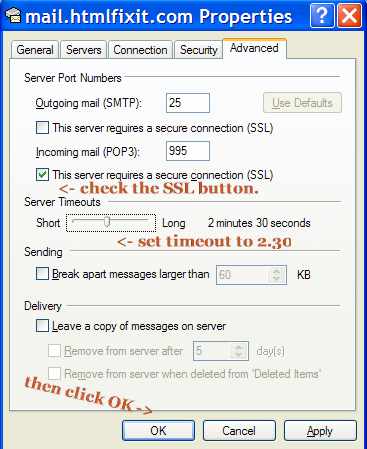
Here is where we tell the account it has to use an encrypted connection to collect the mail.
under the POP3 setting, is a check box with "This server requires a secure connection (SSL)" beside it, you need to click on this checkbox.
Do not check the box with the same name that is in the Outgoing mail (SMTP) section.
While you are in this section, its not a bad idea to move the timeout slider up till it indicates around 2 and a half minutes. That is not strictly necessary, but
it doesn't hurt and could be helpful if the connection is congested. (also because encrypted communications are slighly slower then normal.)

Step 11.
Click "OK" on that window and then the "Close" on the "Internet Accounts" box and your finished.. congratulations.
If you completed all that successfully, you are now setup to check your email using our secure POP3 services. To test that theory, click on the
"Send/Recv" button on the main Outlook Express toolbar, if there are errors, a box will popup and tell you.
Email me any error message at the address listed below and I'll see what I can do.
If you have any problems with this tute, please email me at:
franki@htmlfixit.com assuming of course that you have some method of sending mail
other then our mail account. (if you don't have any other mailing options available to you, pop into our chatroom at: http://htmlfixit.com/cgi-bin/irc/irc.cgi
And Don or myself should be able to get you sorted out.)
